Quantcast
Channel: Nailz Craze
Viewing all 286 articles
Browse latest View live

Swatch & Review: ILNP Nostalgia (H)

$
0
0
Hello again! Today I want to show you my first swatch of the upcoming spring collection from ILNP brand. Barbara from ILNP.com sent me the entire collection which consists of eleven gorgeous colors and effects, I can't wait to show them all to you!
The new Spring 2014 collection from ILNP will be available for pre-order on February 14th on their site, so be sure to stop by and get these prettied for yourself.

I decided to start from the color that interested and impressed me the most, this gorgeous shade is Nostalgia (H). It's actually a holographic version of the older Nostalgia ultra chrome.
My mind was pretty much blown away by this one - an ultra chrome AND holographic? Well hello there, I'm in love! This amazing ultra chrome shifts from green, to gold and red. This polish was amazing on it's own, but the holographic version is an amazing upgrade.
For the photos I used two coats of this great formula alone, no top coat.
Be ware, this post is extremely picture heavy, and these are all photos are of the same gorgeous nail polish in different lighting. Have fun!


ILNP Nostalgia (H) - Direct Sunlight


ILNP Nostalgia (H) - Indirect Sunlight


ILNP Nostalgia (H) - Shade


ILNP Nostalgia (H) - Shade


OPI Push And Shove - Swatch, Review & Comparison

$
0
0
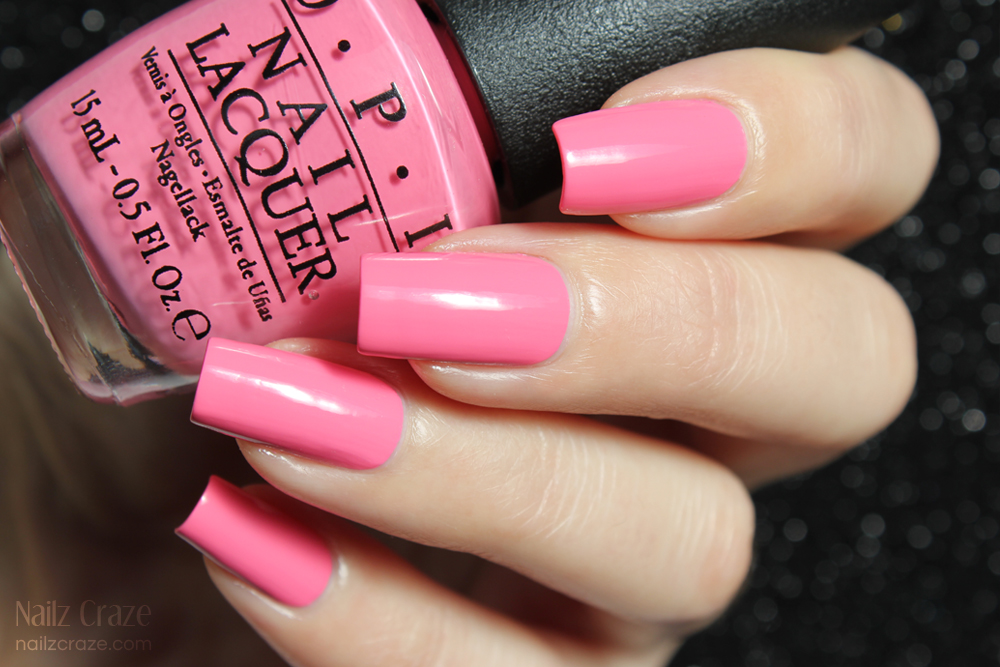
Today I'm going to share with you my swatch for Push And Shove from OPI's Gwen Stefani collection. This collection consists of seven different finishes; Creme, Satin, Glitter and Chrome. The colors in this collection are named after Gwen's songs, all the more reason to love them! As a Gwen Stefani fan I was really excited about this collaboration and I think that the colors in this collection are great and classy, but the ones I was most curious about were Love Angel Music Baby, 4 In The Morning and Push And Shove, which I'm going to show you today.

חברת OPI לא מפסיקה לחדש ולהפתיע עם קולקציות מעולות שיוצאות זו אחר זו, והפעם מדובר בקולקציה שנולדה משיתוף פעולה עם הזמרת גוון סטפני. הקולקציה כוללת שבעה צבעים בגימורים שונים: קרם מבריק, סאטן, נצנצים וכרום בגימור מראה. הלקים בקולקציה נקראים בשמות שיריה של גוון, מה שנותן סיבה נוספת לאהוב אותם! בתור מעריצה של גוון משכבר הימים, שמחתי כשנודע לי על שיתוף הפעולה של הזמרת עם חברת OPI וציפיתי בקוצר רוח לצאת הקולקציה. לדעתי כל הלקים בקולקציה מוצלחים כיון שמדובר בצבעים קלאסיים מעולים, אך הלקים שיותר סקרנו אותי בקולקציה הזו הם הלקים עם הגימורים המיוחדים; Love Angel Music Baby ,4 In The Morningוהלק Push And Shoveשהגיע לידי השבוע, אותו אסקור בפוסט הזה.


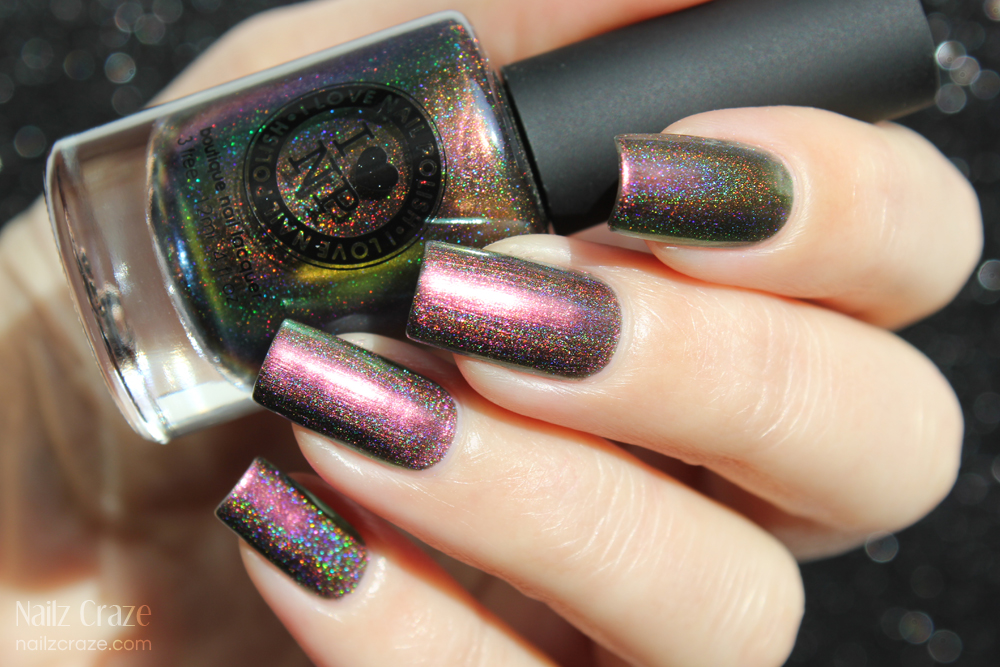
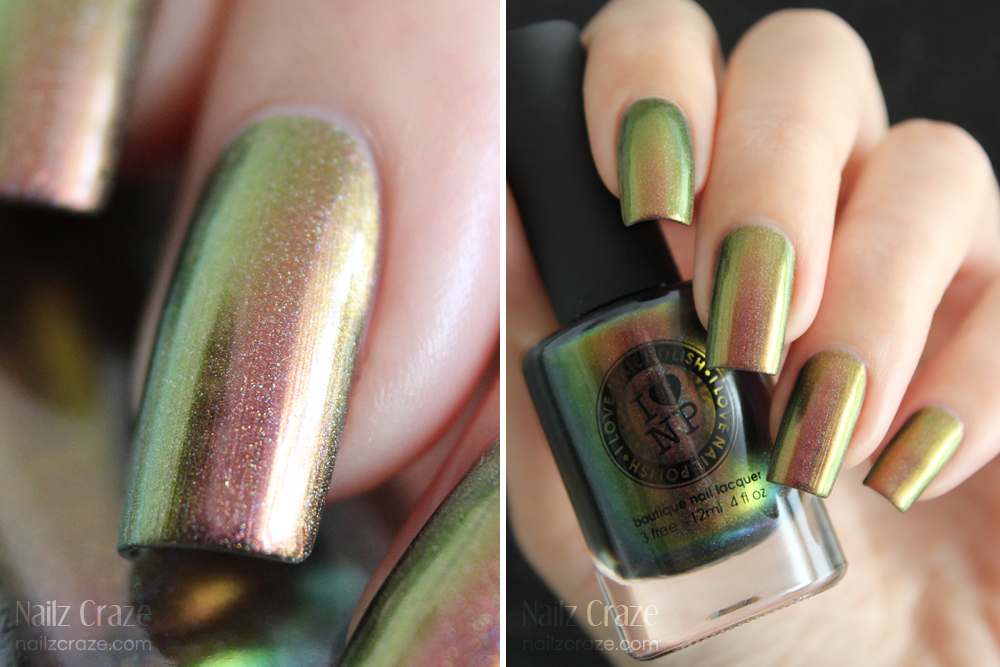
Push And Shove is a silver chrome with a mirror effect. It comes in a duo pack with a special mini (3.7 ml) base coat named Lay Down That Base.
I have to admit, when this mystery color was finally revealed, I didn't get what's all the hype about - Mettalic mirror finish polishes were released quite a while ago, for instance Essie Mirror Metallics collection. But when swatches of Push And Shove started to appear, I was really curious to see what's so different about it, and was is that special? Apparently this is one of those things that you can't fully understand until you try them - so when I finally did, I dell in love!

Push And Shoveהוא לק בגוון כרום בעל גימור מראה המגיע בצמד עם בסיס מיוחד בגודל מיני (3.7 מ"ל) הנקרא Lay Down That Base
אני חייבת להודות, כשהלק המסתורי הזה נחשף, תחילה לא הבנתי על מה כל ההייפ וההתרגשות - הרי מדובר בלק בגימור מראה שכבר יצאו דומים לו לפני זמן רב (לדוגמא קולקציית המראה של Essie - Mirror Metallics). אבל לאט לאט התחילו להופיע סווצ'ים ברשת, ובכל פעם שנתקלתי בלק הזה הוא עורר בי סקרנות. האם הוא עד כדי כך מיוחד? במה הוא שונה מהלקים האחרים? מסתבר שהלק הזה הוא אחד מהדברים שלא מבינים אותם עד שלא מנסים אותם  - וכשסוף סוף ניסיתי אותו, התאהבתי!


To get the perfect chrome mirror effect, OPI suggests to file/buff your nails to smooth them, then apply one thin coat Lay Down That Base and two thin coats of Push And Shove.
I chose to skip the buffing since I'm not really fond of it, so I applied two coats of the base, followed by two coats of Push And Shove.
It's formula was very opaque and metallic, it almost felt like I'm painting my nails with a special paint that was meant to use on real metal. It was completely opaque with one coat but I applied the second coat to smooth any imperfections. 
It dries surprisingly fast, while still drying it looks like a regular metallic nail polish, but when completely dry - it gets it's amazing chrome effect. Only then you realize how beautiful it is.
The nails are getting this amazing metallic mirror finish with a reflective effect. 
I must say that my photos don't reflect the true beauty of it, it was way prettier in real life!

כדי לקבל תוצאה מושלמת וגימור מראה מרהיב, OPI ממליצה לשייף את הציפורן כדי להחליק אותה מהפגמים, להניח שכבה דקה של הבסיס ומעליה שתי שכבות דקות של הלק Push And Shove.
אני בחרתי לנסות להניח את הלק הזה ללא שיוף הציפורן (שזה משהו שאני לא כל כך אוהבת לעשות, ולכן וויתרתי על השלב הזה). הנחתי שתי שכבות מהבסיס Lay Down That Baseומעליו שתי שכבות של הלק Push And Shove
הפורמולה של הלק היתה מאוד אטומה ומטאלית, ממש הרגשתי שאני מורחת על ציפורניי צבע מטאלי שמיועד לשימוש על מתכות. הפורמולה אטומה לחלוטין כבר בשכבה הראשונה, אבל הנחתי שכבה נוספת כדי לקבל כיסוי מושלם ולהחליק פגמים קטנים. הלק מתייבש במהירות מפתיעה, תחילה הוא נראה בגימור מטאלי רגיל, אך המראה המיוחד שלו מתקבל לאחר שהוא יבש לחלוטין. רק כשהלק יבש לגמרי, מבינים את מלוא היופי שלו. הציפורניים מקבלות מראה מטאלי מבריק משקף את הסביבה כמעט כמו מראה אמיתית. אני חייבת לציין שאפקט המראה הרבה יותר מרשים במציאות מאשר בתמונות!


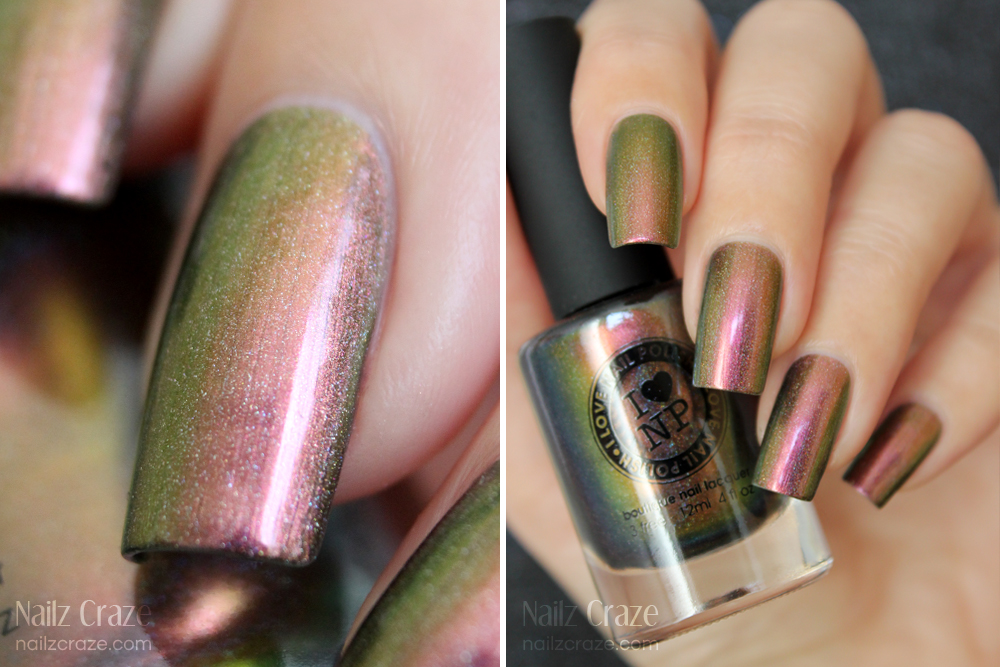
Although this nail polish is pretty amazing, it has a few downsides. The first and most noticeable is that it emphasizes any imperfections on the nails, even those you had no idea they exist. Despite the fact that I applied to coats of the base and two coats of Push And Shove, you could still see ridges and imperfection of the nail, which usually isn't noticeable with most nail polish. This might not be as noticeable in the photos as it was in real life, but that quite bothered me.
Another downsize is it's short durability. OPI instructs not to use a top coat with this polish since it will ruin the special effect of it, so it will keep it's perfect effect and look for a short time.
Another thing that might cause a problem for some of you is the thick quick drying formula. You must be quick when applying it, otherwise you will end up with a streaky and patchy look. I personally didn't have any trouble applying it since I knew I had to work fast.
I think that despite these disadvantages Push And Shove is one of the most special and gorgeous nail polishes I've recently came across, and I'm very glad I tried it. This nail polish manages to pull of an amazing chrome mirror effect like no other brand did. It's true that there are other alternative to create a reflective mirror effect on your nails like stickers and foils, but the fact that you can acheeve this look with nail polish is pretty amazing.

עם כמה שהלק הזה מרהיב ומיוחד, יש לו מספר חסרונות. העיקרי שבהם הוא שהלק מדגיש כל פגם בציפורן, אפילו כאלה שלא ידעתן שקיימים. למרות שהנחתי שתי שכבות של בסיס ועליהן שתי שכבות של לק הכרום, בזוויות מסויימות ניתן לראות פסים ועקמומיות של הציפורן, מה שבדרך כלל לא נראה לעין בשימוש עם לקים רגילים. אמנם בתמונות זה לא בולט מדי, אבל במציאות זה די הפריע לפרפקציונטית שבי.
חיסרון נוסף הוא עמידות קצרה של הלק. OPI מציינים שאין למרוח טופ מעל הלק כיוון שהוא יהרוס את הגימור המיוחד שלו, ועל כן קשה לשמור על הגימור הזה למשך זמן רב והוא נשחק די מהר בקצוות.
דבר נוסף שעשוי להיות מעט בעייתי הוא הפורמולה הסמיכה שמתייבשת במהירות. הלק הזה דורש עבודת ידיים זריזה, אחרת תתקלו במשיכות מכחול בולטות וגבשושיות. אני אישית לא נתקלתי בבעיה הזו כי ידעתי שעלי לעבוד עם הלק מהר, אבל מסקירות אחרות הבנתי שלפעמים נדרשים מספר נסיונות כדי לקבל מראה משולם וחלק.
אני חושבת שלמרות החסרונות הללו, הלק Push And Shove הוא אחד הלקים היותר מיוחדים ומרשימים שנתקלתי בהם, וללא ספק אני שמחה שניסיתי אותו וממליצה עליו בחום. הלק הזה מצליח ליצור את אפקט המראה הכה פופולרי בצורה מעולה כמו שאף לק לפניו לא הצליח. נכון שקיימים בשוק מוצרים אחרים כגון מדבקות וניירות foil, אבל העובדה שניתן להשיג את המראה הה באמצעות לק, די מדהימה אותי.


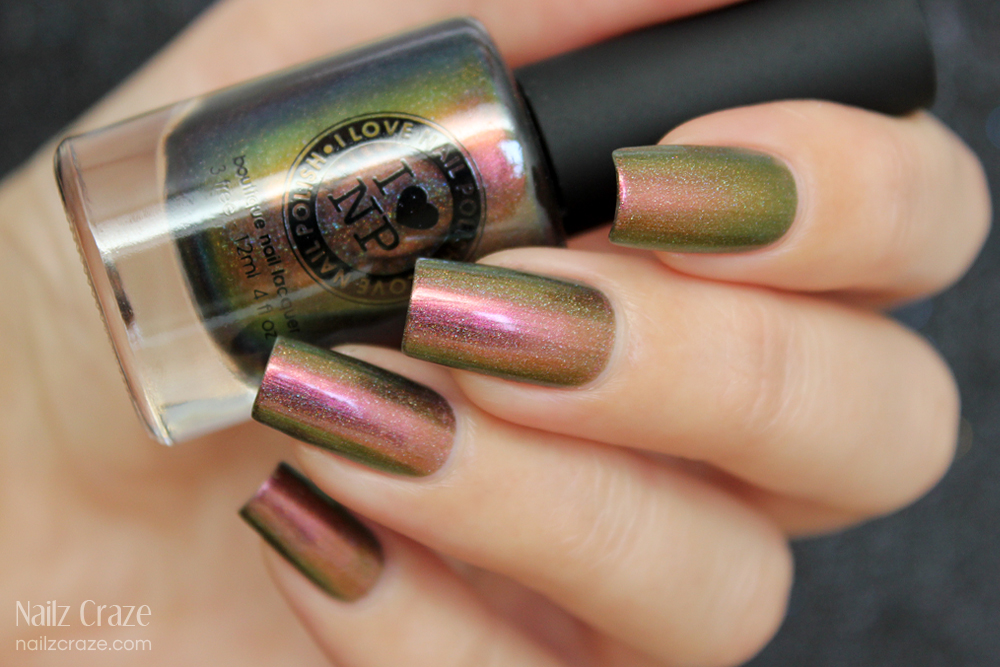
One of the things I had to try once I got this nail polish (besides applying it and adore it) is make a comparison with another mettalic nail polish and see how Push And Shove is differs from it. 
Long time ago I purchased Essie No Place Like Chrome from the Mirror Metallics collection, which I mostly used for stamping. In the bottles these two look pretty similar, but the main difference between them is the chrome effect.
These are my conclusions from the comparison I did:
Both polishes have an opaque formula that can be a one coater, and their drying time is quick.
Unlike OPI, Essie doesn't emphasis imperfection on the nail and provides a smoother look.
In direct sunlight these two look very similair, but in the shade and lower light, OPI's mirror effect is way stronger and impressive.
Here as well the difference between both polishes was more noticeable in real life, and you could clearly see that OPI's mirror effect is stronger and more reflective.
While Essie's polish has a great metallic finish, OPI is the big winner. So if you were like me, wondering what's so special about this one and is it worth it - I can say it is! When you'll try it, you'll understand why it's so great.

אחד הדברים שהייתי חייבת לנסות ברגע שקיבלתי את הלק (חוץ מלמרוח אותו ולהתפעל ממנו) הוא לערוך השוואה עם לק מטאלי אחר שבשרותי, ולהבין איפה בעצם ההבדל בין Push And Shove לבין לק אחר בגימור מראה.
לפני זמן רב רכשתי את הלק Essie No Place Like Chrome מקולקציית Mirror Metallics בגימור מראה, ששימש אותי בעיקר לחותמות. בבקבוק שני הלקים נראים דומים מאוד, אבל ההבדל המשמעותי בניהם הוא בגימור המראה שמתקבל בסוף.
בהשוואה שערכתי בין OPI Push And Shove לבין Essie No Place Like Chrome הגעתי למספר מסקרנות:
שני הלקים בעלי פורמולה אטומה בשכבה אחת, זמן הייבוש מהיר בשניהם. 
לעומת OPI, Essie לא מדגיש בצורה בולטת מדי את פגמים בציפורן והגימור הוא חלק יותר.
בתאורה של שמש ישירה שני הלקים מאוד דומים זה לזה, אך בצל או בתאורה חלשה יותר, אפקט המראה של OPI לחלוטין מנצח את Essie.  
גם במקרה הזה ההבדל בין הלקים בלט הרבה יותר במציאות מאשר שנראה בתמונות, וניתן היה לראות שללק של OPI יש גימור מבריק יותר והשתקפות המראה שלו חזקה יותר מאשר של Essie. בעוד שהלק של Essie מוצלח מאוד כלק מטאלי, אני חושבת ש-OPI מתעלה עליו בהחלט. אם גם אתן תהיתן והתלבטתן כמוני, האם הלק הזה באמת מיוחד ושווה את זה - אני שמחה להגיד לכן שכן! כשתנסו אותו, אתן תבינו למה הוא כל כך מוצלח.


I hope you liked my review and comparison, and if you haven't made up your mine about Push And Shove yet, hopefully this review will help you. I can say that I was very impressed with it and really liked it, actually I fell in love with it. I think that this is one of the most interesting and awesome nail polishes that were recently released, and I totally get what's all the hype about now.
I hope to share with you my impressions of two more colors from Gwen Stefani collection soon (they are actually on their way to me right now), so if you loved this collection and you would like to see more of it, don't forget to come back and check the blog again.

אני מקווה שאהבתן את הסקירה שלי ואת ההשוואה, ושאם עוד לא רכשתן אותו, הסקירה הזו תעזור לכן להחליט מה אתן חושבות לגביו. אני אישית הופתעתי לטובה ומאוד אהבתי את הלק הזה, אפשר לומר שהתאהבתי אפילו. לדעתי מדובר בלק אחד המוצלחים והמעניינים שהושקו לאחרונה, כך שכל הבאז סביבו בהחלט מובן לי כעת.
בעתיד הקרוב אני מקווה לשתף אתכן בשני לקים נוספים שרכשתי מהקולקציה של גוון סטפני (שעדיין בדרכם אלי), אז אם אהבתן את הקולקציה הזו והלקים מסקרנים אתכן, אל תשכחו לחזור לבקר.
את הלק הזה ולקים נוספים מקולקציית גוון סטפני ניתן לרכוש ברשת אפריל ובמכוני טיפוח מקצועיים, מחיר מלא 60 ש"ח.

Cirque Swatches and Review: Lullaby & Iris

$
0
0
Hello ladies! Today I have two more of the Cirque polishes to show you. If you have been following my blog for a while, you probably already know I got these goodies from Dazzled Shop (find more about Dazzled in this post). So let's start!
In this post I will show you my swatches of Cirque Lullaby and Iris from the Arcus collection, two lovely top coats that will look great over just about anything!


Cirque Lullaby is a multi colored glitter in pastels. This is actually a matte glitter (not sparkly) with a semi transparent effect, so it looks a bit different over various colors. There are hex, square and even star glitter in this magical mixture, such a great combination! 
I loved how soft this looks on the nails, and this topper looks fantastic over light and dark colors, so you can't really go wrong with this one.
In the photos I have one coat of Cirque Lullaby over Lime Crime Milky Ways, topped with one coat of Poshe.


Cirque Iris is a multi colored shimmer top coat. Depending on the light you can notice various colors in this one like pink, blue, green, yellow and violet. The colorful shimmer is mostly noticeable over dark colors, but it's also looks lovely and delicate over lighter colors. I think it's a great way to add some dimension and sparkle to any color.
For the photos I applied one coat of Cirque Iris over OPI Miss You-Niverse.


I hope you liked this post and my swatches of these gorgeous Cirque polishes. Let me know which on of these two is your favorite.
Don't forget to stop by at Dazzled Shop and see their selection of Cirque colors and many more indie brands.
Thanks for reading!

Sally Hansen Swatches and Review: Lady Luck & Blingtastic

$
0
0
In today's' post I have two Sally Hansen polishes from the Gem Crush collection to show you. The Gem Crush collection is relatively old in the worldwide market, but it was only recently that it arrived to Israel, and so I got to review two colors from this collection and share them with you.
The Gem Crush collection consists of eight glittery colors, and in this post I will be showing you two super sparkly shades - Lady Luck& Blingtastic.

בפוסט של היום אסקור שני לקים מקולקציית ה-Gem Crushשל חברת Sally Hansen. אמנם הקולקציה הזו הושקה לפני זמן רב בשאר העולם, אבל רק לאחרונה היא הגיעה לארץ.
קולקציית Gem Crushמורכבת משמונה לקים בגימור נצנצים בגוונים שונים, ובפוסט הזה אראה לכם שני גוונים נוצצים במיוחד - Lady Luckו-Blingtastic.


Lady Luck is a mix of fuchsia micro glitter and larger silver holographic hex. This is such a gorgeous combo! The coverage is pretty nice with one coat, and you can get a full coverage of the glitter on it's own with 2-3 generous coats. I chose to apply one coat over a similar color (although it looks much more pink in photos than in was in real life).
This polish is packed with glitter so it was really easy to apply and I got a great coverage with it. For some reason this tiny glitter dried a bit gritty and it is apparently on of those glitters that "drinks" the top coat, so I needed a lot of it to get it perfectly smooth.
For the photos below I have one coat of Lady Luck over Sinful Shine Royal Flush, and two coats of Poshe top coat.

Lady Luckהוא לק נצנצים דקיקים בגוון פוקסיה המכיל גם נצנצים משושים גדולים יותר בגוון כסוף הולוגרפי. השילוב הזה פשוט מקסים בעיני! ללק כיסוי טוב מאוד כבר בשכבה הראשונה, וניתן להגיע איתו לכיסוי מלא בשתיים עד שלוש שכבות נדיבות. אני בחרתי למרוח שכבה אחת של הלק מעל גוון דומה (מרות שבתמונות הוא נראה ורוד יותר, במציאות הגוון היה מאוד קרוב לצבע הלק שבבקבוק).
הלק עמוס בנצנצים קטנטנים ולכן היה מאוד קל למריחה, והכיסוי שהתקבל היה טוב מאוד. משום מה הלק הזה התייבש בצורה מעט גבשושית, כנראה שהוא מסוג הלקים ש"צמאים"לשכבת טופ, לכן השתמשתי בשתי שכבות נדיבות של טופ כדי להגיע לגימור חלק לחלוטין.
לתמונות השתמשתי בשכבה אחת של Lady Luckמעל Sinful Shine Royal Flushובשתי שכבות של הטופ Poshe.


Blingtastic is an aqua blue hex glitter with large silver hex glitter. I really loved this color but I wish the glitter was smaller, like the ones in Lady Luck. That could have been fantastic!
Application was smooth and easy, but I had to apply two coats to get a nice coverage of the glitter.
For the photos below I used two coats of Blingtastic over Barry M Guava, and one coat of Poshe.

Blingtasticהוא לק נצנצים משושים בגוון תכלת בשילוב עם נצנצים כסופים גדולים. מאוד אהבתי את שילוב הצבעים, אך חבל שגודל הנצנצים לא היה זהה ל-Lady Luck שאותו אהבתי יותר. 
הנחת הלק היתה טובה וקלה, אמנם הפורמולה היתה מעט דלילה בהשוואה ל-Lady Luckוהייתי זקוקה לשתי שכבות כדי להגיע למראה הזה.
לתמונות הנחתי שתי שכבות של הלק Blingtasticמעל Barry M Guava, ושכבה אחת של הטופ Poshe.


I hope you liked my swatches and review. I would love to know if you tried this collection and what were your thought of it?
If you haven't seen the entire collection yet, I recommend you to take a look at two swatch posts by Fab Fatale and Scrangie, their swatches are fabulous!

אני מקווה שאהבתן את הסווצ'ים ואת הסקירה הזו, אשמח לדעת אם יצא לכן לנסות גוונים מהקולקציה הזו ומה חשבתן עליהם?
אם עדיין לא יצא לכן לראות את כל גווני הקולקציה, אני ממליצה בחום להציץ בסווצ'ים של שתי הבלוגריות Fab Fataleו-Scrangie, הסווצ'ים שלהן לקולקציה זו מדהימים!
את הלקים ניתן להשיג ברשתות הפארם בארץ, מחיר מלא 59 ש"ח / תכולה 11.8 מ"ל

PUPA Princess Nude & Princess Paillettes

$
0
0
Hi there! In this post I have two lovely colors from PUPA's Princess collection that was released a couple of months ago and just now hit the stores in Israel. I was lucky to get these two polishes in time, before everyone grabs them. I had such a hard time getting my hands on the polishes from the previous collection, and I still didn't get to show them to you. But today I had some time to swatch the new ones I got from the Princess collection, and I really wanted to share them with you.
I would have gladly picked up the entire collection (including the makeup line as well) but since the price always looks a bit expensive for these tiny 5ml bottles (full price is approx $12, but they are mostly sold for half price), I usually pick only a couple colors. I do adore PUPA's makeup and nail polish, I love their colors and the packaging is just amazing, but it's getting a little expensive to buy it all. So this time I picked two colors that I really loved - Princess Nude & Princess Paillettes.


PUPA Princess Nude (225) is a soft peachy creme. I can see why some might thing this is a nude color, but it actually looks more like a peachy pastel to me. I really love this color and these soft tones, I probably have a few in my collection that are quite similar to it like Essie A Crewed Interest. Thinking about it I should probably compare these two sometime.
The formula was nice and I got a nice coverage with two easy coats.


PUPA Princess Paillettes (830) is a pale gold holographic glitter, consists of tiny and large hex glitter. I was really excited to get this one, it was love at first sight! Trust me, it is way more gorgeous in real life. This holographic glitter reflects the light beautifully and it looks like magic in a bottle.
If this glitter look familiar to you, this might be because it looks a lot like Nicole by OPI “Lips Are Dripping Honey” from the new Carrie Underwood collection, but I do believe seeing PUPA's version first a long time ago.
For the photos below I applied one coat of Princess Paillettes over Princess Nude, and topped it with one coat of Poshe.


PUPA's Princess collection includes four colors of nail polish; Nude, Mauve, Green and Paillettes (glitter top coat) and also a Fluffy Velvet Kit with a pink nail polish and a matching shade flocking powder.
I think this entire collection is beautiful, and if I could I would have bought it all. I'm already curious to see the next collection arrive in stores, but this might take a while since it looks we are one collection behind.

Purple Nail Art for Spring With ILNP

$
0
0
Today I have this amazing purple holographic nail art to share with you! For this nail art I decided to combine two beautiful holos from ILNP's upcoming Spring Collection (pre-order stars in February 14th, don't miss it!). I was super excited to try these new holographic shades by ILNP, and I was super pleased with the result. Hopefully you'll like it as much as I did!


Dreaming In Violet is a violet / pale purple holographic shade. It's formula was surprisingly opaque for such a light color, and I ended up using just two coats for the photos below. The color and the holographic effect in this polish were just lovely!


Kings & Queens is a dark red toned purple. This one was a stunner! I was totally amazed by the beautiful color, the great and opaque formula and the spectacular holographic effect. Although I haven't tried out every polish from this collection yet, I think this is my favorite so far (well, Nostalgia (H) was amazing as well, but you should know that purple is my favorite color). 
The formula was really awesome and this could be a one-coater for many of you, but I chose to apply two coats for the photos below.


For this nail art I created a gradient using these two gorgeous holographic shades by ILNP -Dreaming In Violet and Kings & Queens. Although the gradient was beautiful on it's own, I wanted to add something to it and so I stamped the Lily flower image from Bundle Monster BM-314 plate with Konad's White stamping polish. I took the photos before applying the top coat because I was a bit afraid of messing it up (lucky I did because I ended up smearing some parts of the stamped design).
I ended up loving this nail art soooo much! It was really easy to create this look and it was just spectacular thanks to the beautiful holos from ILNP.


I hope you liked my nail art and the new holographic shades from ILNPSpring collection. There are more to come from this collection, so be sure to check the blog again soon.
ILNP is also having an amazing GIVEAWAY for the entire spring collection, so don't miss this amazing opportunity!

http://www.ilnp.com/spring-giveaway-2014

Jewelry & Nail Art: Love Me Tenderly

$
0
0
It's been a while since the last Jewelry & Nail Art post, so I figured it's about time to make a post for this delicate manicure I did a few days ago. I already showed a sneak peek picture with this mani on Instagram and I loved it so much that I even used it as my Facebook page cover, so finally this design gets the post it deserves.
This nail art was inspired by the beautiful opal ring that I got from HW Star. I felt that this delicate ring deserves a matching delicate nail art, and this is what I came up with.


The Nail Art:
I wanted to create a soft and delicate design to match this ring. I knew for sure that I will be using flakes top coat to try and recreate the opal look, but I had a hard time choosing the base color.
Finally I decided to go with a really pale pink color, I got this idea for the color scheme from an almond tree blossom that I saw near my house. I really love it's beautiful soft flowers, they remind me a lot of the cherry blossom.
To create this design I started with two coats of Ga-De Bridal Rose (312), a sheer pale pink jelly. I didn't want this to look like a french manicure, so I sponged some pale pink over the tips / free edge of the nails, I used Essie Fiji for this. 
To create the opal effect I applied two coats of Nubar 2010. Itadded some dimension and sparkle to my design, but unfortunately it was hard to capture on camera and it didn't translate that well to the photos.
Finally I added some stamping with the swirly design from Nailz Craze NC02 plate, using Essie Fiji as my stamping polish. At first I planned on using silver for stamping, but I realized it will look a bit harsh on this soft background. Then I though, maybe white? But finally I chose Essie Fiji, and I was happy I did! For a pale pastel it stamped pretty nice. I don't know if you can see all the details that well, and the gradient might look a bit like one color, but it was prettier in real life. I loved how this manicure turned out and it really complimented the ring.


The Ring:
The lovely opal ring that inspired me to create this manicure is fromHW Star. 
This ring is handcrafted with sterling silver and a white inlaid opal. The design of the ring somewhat reminded me of the infinity sign and I really liked that. This ring is very beautiful and the opal flakes constantly change their color, which makes it even more interesting and pretty.
To find more about HW Star and their jewelry please take a look at my full review post.


Where to buy:HW Star
Price: $35.1
Material: Sterling silver with lab created white opal
Origin: Handcrafted in Thailand, shipped worldwide
Discounts: 15% off with code "hwnailzcraze" (expires June 30, 2014)
Find HW Star also on
Facebook | Twitter | Instagram | Tumblr

Love Letters

$
0
0
Happy Valentine's Day!
Today I have a super cute and extra pink mani that I created for this occasion. It's been a long time since I last created such tacky designs but this came out adorable and I enjoyed creating it, so I really hope you'll like it too!


I chose two sweet pinks from my stash - El Corazon Fenechka № 423/129 (a baby pink creme with black and white matte hex glitter) and Barry M Dragon Fruit (a sweet pink creme with a bit of shimmer to it).
For this design I used the stamping decal technique to create this colored stamped design (check the Tutorial I made a while back to see how it's done). 
When creating the decals I actually skipped the top coat part (see step 5 in the tutorial) and I stamped the design right over the nail, on a tacky (sticky, but not wet) nail polish. It transferred nicely and I didn't have these messy lumps on the nail that you might get when applying a stamping decal as a tiny sheet, so I was pretty pleased with it. I wanted to add a glossy finish to the stamped design, but I was so afraid that the top coat will smear it, so I basically poured the top coat over it lol. Lucky for me it helped and I got this crisp image and a super shiny finish. Phew!


Nail polish I used for this nail art:
El Corazon Fenechka № 423/129 (2 coats, 1 top coat)
Barry M Dragon Fruit (2 coats, 1 top coat)
Konad Black for stamping, Konad White & Barry M Pomegranat to fill the image
Poshe Top Coat
Cheeky CH53 stamping plate

So I hope you liked this design, I would love to hear what you think of it. 
What's on your nails for V-Day?

Swatch & Review: Ga-De Crystal Glitter Collection + Giveaway

$
0
0
A few weeks ago the Israeli brand Ga-De Cosmetics launched a new glitter trio which got me really curious and I couldn't wait to try them. Today I will be showing you this trio up close, and I even have a little surprise for you at the end.
Although this is a mini collection with only three colors, I think Ga-De managed to surprise us with great holographic glitter toppers. It might sound a bit funny, but I was pretty excited to see these kind of interesting finishes and effects from an Israeli brand. We are pretty much used to simple finishes and plain colors from local brands, but this past year they are starting to surprise us with interesting finishes like sugar/sand effects, duo-chromes, flakes and now even holographic glitter.
In this post I will be showing you this new glitter trio featuring the following colors (left to right):
Crystal Galaxy, Crystal Cascade & Crystal Berry. Hope you'll enjoy this post!

חברת ג'ייד הישראלית השיקה לפני מספר שבועות שלישיית לקים חדשים בגימור מנצנץ במיוחד, השלישיה הזו מאוד סיקרנה אותי וחיכיתי להזמנות לנסות אותם בעצמי. היום אני שמחה סוף סוף להראות לכן את הלקים האלו מקרוב, ואפילו יש לי הפתעה קטנה עבורכן בסוף הפוסט.
אמנם מדובר במיני קולקצייה של שלושה גוונים בלבד, אבל אני חושבת שג'ייד דווקא הצליחו להפתיע אותנו בגליטרים הולוגרפיים מקסימים. זה אולי ישמע קצת קצת מצחיק, אבל זה די מרגש לראות גימורים מעניינים כאלה ממותג ישראלי. רק בשנה האחרונה התחילו מותגים ישראליים להשיק לקים בגימורים מעניינים כמו המרקמים החוליים, דואו כרומים, פליייקים ועכשיו גם נצנצים הולוגרפיים. 
בפוסט הזה אסקור את המיני קולקציה הכוללת את הגליטרים הבאים (משמאל לימין): Crystal Galaxy, Crystal Cascade ו-Crystal Berry. מקווה שתהנו!


Crystal Galaxy 826 is a turquoise holo glitter top coat it clear base. It consist of tiny turquoise, gold and silver holographic glitter, and also larger holographic squares.
The formula is nice and one coat is enough for a good glitter coverage. I chose to apply one coat over Essie Mint Candy Apple, topped with one coat of Poshe.
I beleive that you can get this glitter to be fully opaue in about 3 coats, but I didn't try this yet.

Crystal Galaxy 826הוא גליטר בגוון תורכיז בבסיס שקוף. הלק מכיל נצנצים קטנטנים בגוונים תורכיז, זהוב וכסוף הולוגרפי, ונצנצים מרובעים גדולים יותר בגוון כסוף הולוגרפי.
הפורמולה של הלק טובה ומספיק רק שכבה אחת ממנו לכיסוי טוב. אני בחרתי להניח שכבה אחת של הלק מעל גוון מנטה פסטלי Essie Mint Candy Apple (ושכבת טופ של Poshe), אך אני מאמינה שניתן להשיג כיסוי מלא באמצעות כ-3 שכבות של הלק בלבד.
שילוב הצבעים בלק מאוד יפה, והבסיס השקוף שבו מאפשר להניח את הלק מעל כל גוון בהיר או כהה.


Crystal Cascade 827 is a silver holographic glitter. The glitter size mixture is identical in all three colors, just the color changes. Crystal Cascade is actually my favorite glitter from this collection, I love that it has a softer feel and it can look great over any light or dark color.
Another thing that I like about it is that is seems like a pretty close dupe for OPI's In True Stefani Fashion from the new Gwen Stefani collection. I don't own it so I can't really compare the two, but they look pretty close to me. The dupe lovers among you can relate to this joyful discovery. ;)
For the photos below I applied one coat over Ga-De Gray Beige, topped with Poshe.

Crystal Cascade 827הוא לק גליטר כסוף הולוגרפי. תערובת הנצנצים זהה בכל הלקים בקולקציה הזו, אך דווקא השילוב הזה שהוא לכאורה פשוט יותר וחד גוני, מצא חן בעיני יותר מכולם. הגוון הכסוף יכול להיראות מעולה מעל כל צבע ולהוסיף לו ניצוץ הולוגרפי מקסים.
דבר נוסף שחיבבתי בלק הזה הוא העובדה שהוא מאוד דומה ללק שחברת OPI השיקה לאחרונה לקולקצית Gwen Stefani בגוון In True Stefani Fashion. אמנם אין לי את הלק של OPI כדי לעשות ביניהם השוואה, אבל לדעתי מדובר בדיופ די קרוב, ואולי חלקכן יבינו את האושר שבמציאת דיופים :)
הנחתי שכבה אחת של הלק מעל בסיס בגוון בז'ניודי Ga-De Gray Beige, ושכבת טופ של Poshe.


Crystal Berry 828 is the pink version of this glitter, it consists of fuchsia and silver holographic glitter. Formula wise and application was the same as with two previous colors, I chose to apply it over Essie Fiji, topped with one coat of Poshe.

Crystal Berry 828הוא הגליטר הורוד שבקולקציה, הוא מכיל נצנצים בגוונים כסוף הולוגרפי ופוקסיה. 
אם חשקה נפשכן באופציה יותר נשית ומתקתקה, כנראה שזהו הגליטר שתאהבו יותר בקולקציה.
הפורמולה וההנחה היו זהים לשני הלקים הקודמים, ואת הגוון הזה בחרתי להניח מעל בסיס ורוד פסטלי בהיר Essie Fiji, ושכבה אחת של טופ מבריק של Poshe.


 Overall this is a nice collection that every glitter lover would like. Crystal Cascade is my personal favorite from this collection, but they are all great. 
I hope that Ga-De will keep up the great work and will keep releasing new colors and finishes. They are definitely my favorite local brand and if they are going to release more of these gorgeous colors, I don't see how I can ever chance my mind. I even spotted some more new colors recently and I'm excited to show them to you as well, so be sure to check my blog again soon.

בסך הכל מדובר בקולקציה חביבה וגוונים שכל אוהבות הגליטרים למיניהן יאהבו. בעיני הלק המוצלח ביותר בקולקציה הזו הוא הכסוף ההולוגרפי, לדעתי יתאים מעל כל גוון לק שתבחרו ויראה מעולה. אני מקווה שג'ייד ימשיכו לעשות עבודה מעולה עם הלקים ולהוציא גוונים וגימורים חדשים, אין ספק שזו החברה המקומית האהובה עלי (והאוסף שלי יעיד על כך) ואם הם ימשיכו כך, אין סיבה שזה ישתנה. האמת שכבר ראיתי כמה גוונים חדשים שיצאו לפני זמן קצר וגם אותם הייתי חייבת לנסות, אז אם אתן סקרניות לראות כמה מהגוונים החדשים אל תשכחו לבקר בבלוג בקרוב.
את הלקים ניתן להשיג ברשתות הפארם, מחיר מלא 50 ש"ח אך לרוב ניתן למצוא אותם במבצע במחיר של כ-12-15 ש"ח.


 הגרלה - Giveaway

I decided to do a little giveaway and give to one of my readers this beautiful glitter trio. So if you liked these glitters and would love to win them, feel free to join this giveaway. It's open internationally!
The prize - one winner will get the glitter trio I showed in this post (brand new).
How to enter the giveaway?
1. Like Nailz Craze facebook page
2. Share this post on your facebook page
3. Leave a comment to this post with the following info:
your email + a link to the post you shared on facebook
Answer a question - Which one of this glitter trio you liked the most?

The giveaway is open until Friday Feb 21, and the winner will be announced (in this post + on facebook) on Saturday Feb 22.

If you complete all the requirements, you will receive a comment with your number.
Good luck!

אם נשארתן עד הסוף, תשמחו לדעת שהכנתי עבורכן הפתעה קטנה. מאוד אהבתי את הקולקציה ורציתי להעניק לאחת הקוראות שלי את הלקים הללו במתנה, אז אם אתן רוצות לזכות בהם אתן מוזמנות להיכנס להגרלה! ההגרלה פתוחה לכל המדינות.
הפרס - זוכה אחת תקבל סט של שלושת הלקים (חדשים כמובן).
מה צריך לעשות כדי להשתתף?
1.עשו לייק לעמוד הפייסבוק שלי Nailz Craze
2. שתפו את הפוסט הזה בפייסבוק
3. השאירו תגובה לפוסט הזה עם הפרטים הבאים:
רשמו את המייל שלכן + קישור לשיתוף (share) שעשיתן בפייסבוק שלכן לפוסט הזה
ענו על השאלה - איזה לק מהשלישיה הכי אהבתן?

ניתן להירשם להגרלה עד יום שישי ה-21.2 בחצות, הזוכה בהגרלה תוכרז ביום שבת ה-22.2 (בפוסט הזה ובפייסבוק).

אם עשיתן את הכל לפי החוקים, תקבלו תגובה עם מספר ואתן בהגרלה!
בהצלחה!

Swatch & Review: PUPA Lasting Color Gel + Gel Top Coat

$
0
0
In today's post I will show you PUPA's new Lasting Color Gel nail polish in Acapulco Bay and Gel Top Coat from this collection.
This collection consists of 50 creme colors with gel-like glossy finish. So let's get to the swatches and review.

בפוסט של היום אסקור שני לקים של חברת PUPAמסדרת ה-Lasting Color Gelהחדשה שהושקה לאחרונה. מדובר בקולקציה הכוללת 50 גוונים במרקם קרמי ונגימור דמוי ג'ל מבריק במיוחד. בנוסף לליין הצבעים הרחב שיצא בסדרה זו, הקולקציה כוללת גם את הלק Gel Top Coat שהוא שכבת טופ המעניקה את אותו גימור הג'ל המבריק כזכוכית לכל לק.
בפוסט הזה הסקור את הגוון Acapulco Bayואת שכבת הטופ Gel Top Coat, מקווה שתאהבו את הסקירה והתמונות ותהנו מהפוסט.


Acapulco Bay(036) is a bright tropical pink creme with a neon hint. It has a glossy gel like formula, very similar to Barry M's Gelly Hi-Shine collection. PUPA's Lasting Color Gel collection isn't a real gel nail polish that you need to cure in UV or LED lamp, but a regular nail polish with a super glossy finish similar to a real gel polish.
The formula was on the thick side but easy to apply, very pigmented and provided a great coverage with just one coat, but I applied two coats to smooth it and get a perfect coverage.
Drying time was fast and within a few minutes it was completely dry and ready for a second coat / top coat. The finish was very shiny and glossy as promised, so I was pretty pleased with it. 
I've been wearing this nail polish for the third day now and it's still in pretty great shape and very glossy, and this color is just great - I've really missed wearingbright pinks and neons.

Acapulco Bay 036הוא לק בגוון ורוד טרופי עם רמיזות של ניאון, בעל פורמולה קרמית וגימור ג'ל מבריק. 
אל תטעו, לא מדובר כאן בלק ג'ל הדורש ייבוש תחת מנורת UV או LED, אלא בלק שמתייבש באוויר ככל לק רגיל. הייחוד של סדרת הלקים PUPA Lasting Color Gelהוא הגימור המבריק שלהם, בדומה ללק ג'ל מקצועי. זה מאוד הזכיר לי את הסדרה של חברת Barry M שהוציאו לקים בגימור ג'ל דומה תחת השם Gelly Hi-Shine. 
הפורמולה של הלק היתה סמיכה (לטובה) ובעלת פיגמנט מעולה שנתן כיסוי טוב מאוד כבר בשכבה הראשונה, ובשכבה השניה התקבל מראה חלק ומושלם. זמן הייבוש היה מהיר ותוך מספר דקות הלק הרגיש יבש לחלוטין ומוכן לשכבה השניה / לשכבת הטופ. גם הגימור של הלק היה מבריק כמובטח, אז אני הייתי ממש מרוצה.
בנוגע לעמידות קצת קשה להעיד, הרי שזה מאוד אינדויבידואלי ותלוי במספר גורמים (בעיקר בשכבת בסיס איכותית וטובה) אבל עלי הלק מחזיק בצורה מעולה כבר שלושה ימים.
הגוון עצמו מעולה בעיני, לדעתי אין מקום לטועויות עם צבע כל כך טעים וטרופי, וזה זמן מעולה לשלוף את הצבעים הורודים והניאוניים האלו מהמגירה.


Apparently the Lasting Color Gel line has a new wide brush which I wasn't really fond of at first. PUPA's regular nail polish line has a long and slim brush (right) and the new Gel brush is shorted and wider, with a curved edge (left). I have to admit I didn't like it a first because I'm used to applying nail polish with slimmer brushes and I really love these, but for those of you who are having a hard time dealing with nail polish application, the new Gel wide brush will probably be just perfect.

מסתבר שכל הלקים שבקולקציית Lasting Color Gelבעלי מברשת רחבה, קצרה יותר ומעוגלת (שמאל), לעומת המברשות של הלקים בקולקציות הרגילות שהן דקות וארוכות (ימין). אני חייבת לציין בהתחלה קצת התאכזבתי, כיון שאני מאוד אוהבת את המברשות הדקיקות של PUPA ואני מעדיפה לעבוד עם מברשות דקות לקבלת תוצאות מדוייקות. אבל - אני בטוחה שעבור בנות שפחות מנוסות במריחת לק, מברשת הזו תהיה מעולה! למשל בזרת שלי באמת הייתי יכולה להסתפק במריחה ישרה אחת מושלמת באמצעות מברשת המניפה העגולה, ואם יש בנות שהציפורניים שלהן קטנות יותר משלי ופחות מעוגלות, עבורן המברשת הרחבה תהיה מושלמת.


The Gel Top Coat actually was a pleasant surprise. I didn't expect much from a top coat which is not a fast drying top coat, taking in mind that I've tried several top coats in the past but nothing compared to Poshe. PUPA suggest to apply the Gel Top Coat over a completely dry nail polish, so it will not dry through the coats of polish, but it provides a super glossy finish, as impressive as does Poshe and Seche Vite.
Apparently a wide brush combined with a top coat is a great idea and it worked great for me here. It even has a huge plus when it comes to using top coat over stamping and nail art, which totally minimized smearing. I will be telling you all about this in my next post, featuring these two products in a new nail art I did.
The Gel Top Coat has a great shine, it's durable and preserved my nail art in a great shape for the third day now (and going), and it dries fast with a beautiful glass like finish. I really liked this top coat and will probably use it mostly over stamping to prevent smearing, since the bottle is quite small and I tend to finish my top coats fast.

ההתנסות שלי עם לק ה-Gel Top Coatדווקא הפתיעה לטובה. חייבת להודות, לא ציפיתי ליותר מדי משכבת טופ שהיא איננה מייבש לק, הרי שאני מכורה ל-Poshe ועד כה לא מצאתי משהו טוב יותר. PUPA ממליצים למרוח את שכבת הטופ מעל לק יבש לחלוטין, מה שאומר שלא מדובר כאן במייבש לק, אבל הגימור אכן מבריק כזכוכית ומרשים במיוחד, כך שבקטגוריה הזו אני חושבת שהטופ ג'ל מהווה מתחרה ראוי לגימור המבריק שנותנים Poshe ו-Seche Vite.
דווקא פה המברשת הרחבה הסתדרה לי מעולה והקלה על המריחה של שכבת הטופ. כאן גיליתי משהו מעניין - מסתבר שלמברשת הרחבה יש יתרון מיוחד כשזה נוגע למריחת שכבת טופ מעל נייל ארט ושימוש בחותמות. על כך ארחיב בפוסט הבא בו אראה לכן נייל ארט שעשיתי עם הלק הזה.
ל-Gel Top Coat גימור מבריק ומעולה, והעמידות שלו טובה גם כן (כאמור, זהו היום השלישי והלק נראה מעולה) וזמן הייבוש שלו מהיר (אמנם הוא לא מייבש את הלק שתחתיו). מאוד אהבתי את הטופ הזה, וסביר להניח שאשתמש בו בקמצנות מעל החתמות ונייל ארט, כיוון שטופ רגיל מסתיים אצלי די מהר.


As for pricing, here in Israel you can find PUPA's Lasting Color Gel collection for $6 USD (5 ml) and the Gel Top Coat for $8.5 USD (5 ml).
According to the company in Israel there are 50 shades in this collection, but PUPA's main site in Italy shows there are 59 shades in total. You can see the swatches of all shades on their site, I think these are all great colors that everyone could relate to and like. I know I would love to add them all to my stash. 
So this is it, I hope you liked my swatch and review. Check back again soon for a nail art I did with this beautiful nail polish and the Gel top coat. Thanks for reading!

את הלקים של חברת PUPAמסדרת Lasting Color Gelניתן להשיג ברשת הסופר פארם במחיר מבצע קבוע של 21 ש"ח (5 מ"ל) ואת לק הטופ Gel Top Coatבמחיר של 30 ש"ח (5 מ"ל). 
לדברי החברה (בארץ) קיימים 50 גוונים, אך באתר האיטלקי של PUPA קיים מגוון של 59 צבעים (ייתכן שלא ייבאו לארץ את כל הגוונים, אולי שאולי מדובר בטעות?). תוכלו להתרשם מהגוונים באתר, יש הרבה צבעים יפים וקלאסיים שלדעתי כל אחת תאהב (הייתי בשמחה מאמצת את כל המגוון, באמת קשה לבחור רק אחד!).
אז זהו, מקווה שאהבתן את הסקירה. אל תשכחו שיש לי עוד פוסט עם נייל ארט שעשיתי בשילוב הלקים שבסקירה הזו, אז יש עוד מה לראות. תודה שקראתן!

Bright & Fun nail art with PUPA

$
0
0
Hello ladies! So yesterday I showed you my review of two PUPA Lasting Color Gel products, and as promised, today I'm going to show you a nail art I created with this pair, adding some stamping and glitter! It was such an easy nail art to create and I'm having so much fun wearing this bright mani, so I hope you'll like it too.

היי בנות! אז אתמול הראתי לכן את צמד הלקים החדשים של PUPAמסדרת ה-Lasting Color Gel, וכמובטח היום אני משתפת אתכן בנייל ארט שעשיתי עם שני הלקים, בתוספת החתמה ואיך לא - קצת גליטר! העיצוב הזה היה ממש פשוט וכייפי, ואני מאוד נהנית להסתובב איתו בימים האחרונים, כך שאני מקווה שתאהבו אותו גם.


To create this nail art I applied two coats of PUPA Lasting Color Gel in Acapulco Bay, a super bright tropical pink which I really loved. I added some stamping from Gals plate GA34 using Konad's black stamping polish. This design turned out pretty great, I can't really decide if it's some sort of a tribal design or maybe a lace, but I really love it. 
I wanted to add some sparkle to this mani so I applied Chaina Glaze Glitz'n Pieces black and silver glitter to two nails. This glitter mix is super dense so I used only one coat.

כדי ליצור את הנייל ארט הזה התחלתי בשתי שכבות של הלק PUPA Lasting Color Gelבגוון Acapulco Bay, צבע ורוד טרופי עם אפקט ניאוני, והוספתי החתמה מהדיסקית Gals GA34עם לק שחור של Konad. העיצוב הזה מאוד מצא בעיני, למרות שלא ידעתי האם להגדיר אותו בתור עיצוב Tribal או תחרה.
רציתי להוסיף קצת נצנצוץ לעיצוב הזה אז השתמשתי בלק של China Glaze Glitz'n Piecesשהוא גליטר שחור וכסוף. תערובת הנצנצים שבלק הזה מאוד צפופה ולכן השתמשתי בשכבה אחת.


Finally, it was time to apply the top coat - I used PUPA's Gel Top Coat which turned out to be fantastic! It added stunning gloss and shine to my design, and most important, it didn't smear the stamping at all!
The wide brush came in handy and helped to spread the top coat easily and with only two brush strokes. Some of you may know that the key to applying a top coat over stamped design without messing it up is using a generous amount of top coat, use minimum pressure and as little brush strokes as possible. Well, PUPA's top coat with its' wide brush as perfect for this!
I'm planning on using this top coat from now on with all of my stamped designs. And look at that beautiful shine, sooo glossy! I was super happy with this top coat.

לבסוף, הגיע הזמן להוסיף שכבת טופ לעיצוב הזה - השתמשתי בלק PUPA Gel Top Coatוהוא היה פשוט מעולה! הלק הוסיף ברק מדהים לעיצוב, והכי חשוב - כלל לא מרח את ההחתמה!
המברשת הרחבה של הלק היתה מאוד שימושית במריחת הטופ מעל ההחתמה והסתפקתי בשתי במשיכות מברשת בודדות. חלקכן אולי כבר יודעות שהמפתח למריחת שכבת טופ מעל החתמה הוא במריחה נדיבה וקלילה של הטופ, תוך כדי שימוש של כמה שפחות משיכות מברשת מעל העיצוב. הלק טופ של PUPA המצוייד במברשת קצרה ורחבה היה מעולה למשימה זו!
בעתיד אני מתכוונת להשתמשת בלק הזה כשכבת טופ מעל כל עיצובי החותמות שלי. וכמובן שאי אפשר להתעלם מהברק היפיפה שהוא מעניק לעיצוב, כל כך מבריק! היתי סופר מרוצה ממנו.


Here's a closer look at Chaina Glaze Glitz'n Pieces glitter. It looks awesome on the nail although it wasn't' completely smooth because of the large glitter, but I think PUPA's Gel Top Coat did a pretty good job smoothing it up.

מקרוב אל הגליטר של China Glaze Glitz'n Pieces. הוא נראה מעולה מעל הלק, אך היה מעל מחוספס למגע בגלל חתיכות הגליטר הגדולות. אני חושבת שהטופ של PUPA דווקא עשה עבודה די טובה בלהחליק את פני הציפורן.


And a cloesr look at the stamped design on the ring finger. In the macro shot you might notice some imperfection of the stamping, but in person this really looks flawless! And again, can't ignore the stunning glossy finish this top coat added to the design, it's really that great.
I hope you liked this designs, I would love to hear your thoughts!

ומבט מקרוב על ההחתמה, בתמונת המאקרו ההחתמה אולי נראית מעט עקמומית, אבל במציאות ובגודל אמיתי היא נראית מושלמת! ואיך אפשר בלי לציין לשבח (שוב!) את הברק המדהים שמעניקה שכבת הטופ של PUPA לעיצוב. לדעתי הטופ הזה באמת מעולה והוא הרוויח ביושר את כל השבחים שהרעפתי עליו בפוסט הזה.
מקווה שאהבתן את העיצוב! אשמח לשמוע מה דעתכן :)


Beauty Review: PUPA Pupart Pocket Kit in Smoky Purple

$
0
0
Hello ladies! Today I have a quick review of an eyeshadow palette from PUPA. I spotted this kit at the Super Pharm drugstore and since it was on a pretty nice discount, I had to have it! Besides, I really love PUPA's products and this kit was small and cute, so for that price ($14) I felt like this is a great bargain.
The Pupart Pocket Kit comes in three variations of colors: 001 Smoky Marine, 002 Smoky Brown and the one I got is003 Smoky Purple


The kit includes a small palette with five eyeshadow colors and an eye pencil with a felt tip for blending and creating a smoky eye effect. I loved that this kit is compact and small, it can easily fit in any makeup bag and still leave much space for other items. Although the palette is small, I didn't feel like the eyeshadows were smaller than in regular kit and they will probably last for a long time and many uses.


The Pupart Pocket Kit in Smoky Purple has five colors with different effects: warm purple and rose taupe with a satin effect, beige and white in matte and warm white with a pearly shimmer finish.
These colors were really lovely and natural, I think you can create nice combinations with them and get a great result. I loved that these are not all the same finish/effect, although the matte colors were less impressive. The pigments were good and rich, especially with the two colors on the left.
The eye pencil that comes with this kit is a dark purple, it also has a really great color and pigment. On the other end it has a felt tip that is meant to use as a blending 'brush' to create a smoky eye effect, or you can just use it as an eyeliner or a regular eye pencil.


Overall I think this is a pretty nice kit, and it's great for creating everyday looks. I hope to see more compact kits like these from PUPA in the future with more shimmery and satin effects.
Hope you liked me review, and if you got to try this kit or another one from this series, I would love to hear what were your thoughts. Thanks for reading!

Swatch & Review: My Picks from OPI Brazil Collection

$
0
0
Hello there! Well, today I some swatches of the OPI Brazil collection. The collection consists of 12 colors in total, 11 cremes and one duo chrome. There are four liquid sand colors that are a part of this collection, only available in a mini set.
I decided to pick four colors from this collection, and these are my picks (L-R): Opi Scores A Goal!, Don't Bossa Nova Me Around, Kiss Me I'm Brazilian and Live.Love.Carnaval
I have to admin, when I first saw the press release of the Brazil collection, I wasn't really into these colors and I thought to myself "meh, these are just cremes..." but I decided to try a couple of them anyways, and I was actually pretty impressed with their formula. So they may be "just cremes" but I think there are some nice colors after all and the great formula is worth giving a try.
So let's get the swatching started!


Live.Love.Carnaval - A bright coral, creme formula, 2 coats. I really loved this color! 
The formula was awesome, very opaque and pigmented.
Seeing it in others' swatches I was afraid it's going to lean towards orange, but I was pretty happy when I saw it in person. I think this is a great bright color for summer / spring and I have a feeling I will be wearing it a lot!


Apparently I really love corals with a pink undertone, so I thought it would be a good idea to compare my picks from OPI's Brazil collection to other colors from my stash, so here you go. 
These look pretty close, but no perfect dupe was found.

L-R: OPI Cajun Shrimp, OPI Live.Love.Carnaval, Essie Sunday Funday, PUPA Acapulco Bay, Ga-De Fruit

Kiss Me I'm Brazilian - A bubblegum pink, creme formula, 2 coats. 
Classic pink shade, can't go wrong with it. Again, really good formula and great opacity. 


I always assume that I have so many pink shades so I don't normally buy much of these, but when I reached to my stash I could barely find anything that was even remotely close to this color, so here are my two so-not-a-dupe shades that picked to compare it to. ;)

L-R: Barry M Dragon Fruit, OPI Kiss Me I'm Brazilian, Orly Pixy Stix

Don't Bossa Nova Me Around - Pale nude with a pink undertone, creme formula, 2 coats.
Oh I had such high hopes for this one, but I was was a bit disappointed.
I really love nude colors on others and I'm tempted to buy them, but I end up not liking them on myself most of the time. Hopefully when summer comes I will get some tan (at least on my hands) and then this color will look better on me, but meanwhile I'm not that crazy about it as I hoped I would be. Still, not giving up on this one yet since the formula was amazing for such a light color, super opaque just like the previous two.


In my swatch Don't Bossa Nova Me Around looks kind of grey and just pale, but you can see it has a pink undertone when compared to other colors on the swatch wheel (middle).

L-R: Ga-De Pale Shell, Essence Iced Latte, OPI Don't Bossa Nova Me Around, Barry M Lychee, OPI My Vampire Is Buff


Opi Scores A Goal! - A raisin / brown with red undertone, creme formula, 2 coats.
Although brown isn't really my color, I though to give this one a try, hoping it will be a bit more red,.. Well, it wasn't what I hoped it to be, but the color looked nice with my skin tone and the nail length.
It has a rich color, reminds me of chocolate deserts in some way.
The formula was a bit sheer with the first coat, but the second coat evened it out. It's a bit odd but this color seems to have a much thinner formula, even compared to Don't Bossa Nova Me Around.


As you can see, I don't have anything like this color in my stash and the colors I chose to compare it to are not even close, but that's what I got here.

L-R: Essie Shearling Darling, OPI Opi Scores A Goal!, Essie Recessionista

So these are my picks and swatches of OPI's Brazil collection. Overall I like the colors I picked but I can't say they are super unique. I wish there were more interesting and original shades and finishes to this collection, but it's pretty hard to please a girl who already has such a big collection.
Let's just wait and see what OPI will bring us with their next collection.
Hope you lied this post, I would love to hear what are your picks from OPI Brazil collection and what are your thought of this collection.

Fantasy Anniversary Edition Britney Spears Perfume

$
0
0
In today's post I will be showing you my review of a new fragrance from Britney Spears that was designed as a special Anniversary Edition, as a thanks for her fans and for 10 years of creation.

בפוסט של היום אשתף אתכן בסקירה של הבושם החדש מבית בריטני ספירסשהושק לאחרונה במהדורת עשור מיוחדתוחגיגית. Fantasy, הבושם המוכר של בריטני ספירס, הושק במהדורה מוגבלת באריזה מיוחדת לציון עשר שנות פעילות והוקרת תודה למעריציה.


In a black and elegant bottle Britney presents her sweet and popular scent inspired by lychee, kiwi and quince at the top; jasmine, orchid, white chocolate and cupcake accord in the heart; and musk, orris root and woody notes in the base. 
Fantasy Anniversary Edition is a limited edition that comes in a special packaging - black bottle adorned with golden crystals and box inscribed with the names of her biggest fans from around the world. The bottles come with one of three different messages: "10 hugs and 10 kisses", "To my sweet scented fans for the decade of love"and"You are my inspiration,"XOXO Britney". There are also 100 bottles that Britney personally signed. 

בבקבוק שחור ואלגנטי בריטני מציגה את הניחוח המתקתק והפופולארי שלה בהשראת פירות עסיסיים ופרחים לבנים, תערובת מפתה של ליצ'י אדום, חבוש מוזהב וקיווי אקזוטי, משתעשעים עם אקורדים מעודנים של עוגייה, עלי כותרת של יסמין וסחלב לבן שוקולד. 
בקבוק הבושם עשוי זכוכית שחורה ומעוטר בקריסטלים זהובים, עליו מתנוסס מסר אישי מבריטני בכתב ידה. הושקעה מחשבה אפילו בפנים אריזת הקרטון הבושם שמוקדש למעריצה, בתוכה רשומים שמותיהם של מעריציה מ-85 מדינות שונות בעולם.
הבושם מגיע בשלושה גדלים, ובכל אחד מהם רשום מסר אחר מבריטני, כך כשכולם מסודרים יחדיו בשורה, מקבל המסר המלא: "10 חיבוקים ו10- נשיקות... לאוהדיי המתוקים עבור עשור של אהבה...אתם ההשראה שלי..."תחת כל הודעה חתמה בריטני"XOXO Britney". בריטני אפילו הוסיפה הפתעה נוספת וחתמה על 100 בקבוקים אישית, שנשלחו לחנויות שונות ברחבי העולם.


I think this is a lovely perfume and package with a special message that every Britney fan would love.
The bottle is pretty and elegant, the scent is quite sweet and stays for a long time. Personally I prefer a fresher scent but this is a great perfume for me for the winter.
The bottle contains 100 ml, full price in Israel is 200 ILS (~$57).

אין ספק שהושקעה מחשבה גדולה באריזת הבושם הזה, ולדעתי מדובר במארז ייחודי ומקסים שכל מעריצי בריטני יאהבו.
בקבוקון הבושם מאוד יפה ואלגנטי בעיני, ריח הבושם היה מתקתק ובעל נוכחות ונשאר לאורך זמן. לרוב אני מעדיפה ריחות יותר עדינים ורעננים לאורך השנה, כך שלדעתי זהו בושם שמתאים יותר לחורף בשבילי כיוון שהוא די מתוק.
תכולת הבקבוק 100 מ"ל ומחירו המלא הוא 200 ש"ח, ניתן להשיג ברשתות השיווק והפארם בארץ.


Ga-De Vintage Silver

$
0
0
Today I have for you two swatch posts with new Ga-De shades that were recently added to the brand's core line. I was pretty surprised that I didn't notice them at first, but when I realized that these are in fact new shades that  didn't see before, I grabbed a couple (well, maybe five or so) and of course was excited to try them. So in this post I will be showing the first shade I picked - Ga-De Vintage Silver (448).


Ga-De Vintage Silver (448) is a dark silver with a shimmery metallic finish. I think the name is perfect for this color and describes it well! I would say it has a silver colored base and silver micro flakes. It reminded me a lot of OPI's Haven’t The Foggiest from the San Francisco collection, and I think it can be a pretty close dupe (I wish I had a way to compare the two but I don't own OPI's version).
The formula was just superb, smooth and very opaque, so it can totally be of these great one-coaters.
Once I tried it, I instantly fell in love with this color, which actually surprised me. I used two coats for the photos, but I'm not sure is was really necessary.

Direct Sunlight

Indirect Sunlight

When I thought I couldn't love it more, I decided to add a matte top coat - and then I was like WOW! It is stunning! I applied one coat of Revlon Matte Top Coat and it gave the polish a satin smooth look and texture, which was very beautiful.
I really love the soft effect it created, and the funny thing about these photos is that you can actually see how a metallic finish makes the nails appear much longer and "slimmer", compared to thesoft satin look, which I ended up loving even more.


Direct Sunlight

Indirect Sunlight

I feel like Ga-De are stepping up a gear and creating more and more beautiful colors and finishes, and this is just awesome! I couldn't be happier!
This color was one of my best recent purchases and I'm super pleased with it!
In my next post you will get a closer lookat another new shade from Ga-De, so stay tuned.


Ga-De Blue Satin

$
0
0
So as promised, here's my second post with one of the new shades by Ga-De. This is Ga-De Blue Satin (493), a surprising duo-chrome! I was pretty excited seeing it among the new shades, although Ga-De released duo-chrome finishes in the past. The color is very nice, but as many of you know, duo-chromes (and multi-chromes, oh boy!) are pretty much a pain to capture on camera, so I did my best to give you a closer look at this color. So let's check the swatches.


Ga-De Blue Satin (493) is a teal duo-chrome that shifts from teal to blue. As expected from a duo-chrome polish, it has a semi metallic finish. 
The formula was nice and smooth. At first I thought it's a bit sheer but I ended up using only two coats to get a perfect coverage.
The color was really interesting and I didn't recall seeing it elswhere, which was pretty surprising,.. But then I stumbled upon a swatch of Nicole by OPI Emerald Empowered and I realized that this might also be a pretty close dupe. Oh well, don't see anything bad there since I don't own any of NOPIs polishes in my collection, and this color is really nice!


I took some pics in the sun, although I can't say they are really flattering for this finish, and it looks a bit odd. Excuse the blurry parts in the photos, it was a bit hard to capture a sharp image of this color because it was kinda radiant in the sun. You probably already noticed that duo-chromes look way better in shade.


Overall this was another great color and interesting effect that I was glad to see among the new shades. There are a few more shimmery and metallic colors that were added to the collection, but I didn't feel they were special enough to get. I did get three more cremes from the new shades, which I hope to show you soon, but this is it for today. ;)
Hope you enjoyed this post, thanks for reading!

Roses Are Red...

$
0
0
Hi ladies! For today I have a quick nail art that I actually created as one of my Valentine's Day designs, but didn't get to share with you in time.
So if you would like to see how I created this design, keep reading! :)


For this design I picked a beautiful and unique red nail polish and one of the recent Nailz Craze stamping plates. To start this design I applied one coat of Barry M Pomegranate to create a solid and completely opaque base.
Then I applied two coats of El Corazon Fenechka № 423/121 , a delicious red crelly (creme-jelly) with black and white hex matte glitter. This mixture is truly awesome and easily creates an interesting look. You can get it pretty opaque on it's own with 3 coats, but since it was a bit jelly, I preferred to layer it over a red base.
For the stamping I used the rose design from the Nailz Craze NC06 plate, stamped with Konad's White stamping polish, and finally topped with one generous coat of Poshe to prevent smearing.


I love that this design was super easy to create and it looks pretty neat. I liked how the roses turned out and that in some parts they look a bit abstract, so you don't see right away that these are roses.
Hope you liked this quick and easy nail art, I would love to hear your thoughts.
Thanks for stopping by!

Katy Perry Dark Horse Inspired Makeup & Nail Art

$
0
0
Hello ladies! So today I have a special post to share with you, it's actually a collaboration I've been working on with a fellow blogger from Israel, Tal Peleg - who is an amazingly talented makeup artist!
So how did it all begin? A week ago I've watched Katy Perry's new music video "Dark Horse", and I was inspired by the fun and colorful theme of this clip where she rocks these gorgeous makeup looks and fun nail art designs. I though this could be interesting to create a nail art design and a makeup look inspired by this video, and I was happy to have Tal join me on this fun project.
So for this post each of us created a look that was inspired by Katy Perry's Dark Horse video, and this is what we came up with! Keep reading to find out how I created this nail art and also get a closer look at Tal's makeup look.


When creating this look, I was inspired by three nail are designs from this video and I came up with a little mash up version of my own. I can't say it was one of the easiest designs I've made, but I was so pleased with how it turned out so I'm very excited to share this look with you and hear what you think.


For this nail art I chose to work with black, blue and gold color scheme that was very dominant in the clip. The colors I used are: Zoya Storm, Ga-De Blue Angel, Barry M Gold Foil and WOW Black & White.
To create this design I used a few different techniques; I used sponging to create a gradient on the thumb, index and pinkie, then drew an contour line with a thin nail art brush at the base of the nail.
For the Egyptian symbols and the gold shreds I painted squares on a plastic bag with gold and white nail polish, let them dry overnight and removed from the plastic bag once completely dry. I'm not sure how to name this technique but it's pretty common and I've see others use it before, then you can basically use scissors and cut it out to any shape you like.


Creating the Ankh (represents the concept of eternal life) and the Eye of Horus (symbol of protection, royal power and good health) was pretty challenging and it took some practice, but if you are equipped with small scissors, a steady hand and a lot of patience - that's something that can be done.
To make it easier to cut I printed the symbols on paper in the desired size, then aligned and taped it to over the dry nail polish sheet I prepared, and cut the shapes carefully. Cutting out the middle was pretty much impossible with such small shapes, so I found a way around it - with the Ankh I just painter the inside of the loop with black polish, and with the Eye of Horus I cut through the middle (you might notice a small cut on the left corner of the eye) and then I just had to add the apple of the eye with a dotting tool. I know it's way too much information, but I wanted to make it as detailed as possible so hopefully you can understand how I created these shapes.
You might wonder why I didn't just paint the symbols over the nail with a thin brush, well I've tried this at first but it didn't turn out exactly how I imagined it and the result wasn't as crisp and precise.
I'm glad I went for the cutting out option, I think it turned out perfect and exactly how I imagined it, so the hard work really payed off!
All I had to do now is layer the shapes I created on the nails and top it with a top coat to smooth the design.


To bring the nail art to life I equipped myself with some gold jewelry from my collection. I'm wearing my mom's Vintage Amber Ring and some stacking rings from Galisfly. I'm also wearing a gold pyramid studded bracelet that I got from asos.com. I think they are a great addition to the Egyptian look and feel.


I had so much fun creating this design and I was super thrilled when it turned out even better than I imagined it! A little challenge once in a while can't hurt, but I feel like it will be pretty hard to create a design that will top it off.
I hope you liked this nail art I created and Tal's makeup look, and that this was a fun post for you to read as much as it was for me to create it. :)


Here's another look at Tal's makeup art! I was thrilled to hear that she liked my nail art and decided to go along with it in her makeup look, it turned out fantastic!
Be sure to check Tal Peleg's blogand to follow her on facebook and instagram for more amazing and creative makeup looks. You will be amazed to find out what can be created with only makeup, fine brushes, and a huge talent!

Beauty Review: Careline Color Bronzer in Golden Rose

$
0
0
Hello ladies! Today I have another beauty review to share with you, this time geaturing a new bronzing product from Careline. I just tried this bronzer today and I'm here to share with you my impressions. Hope you'll enjoy this review!

שלום בנות! היום מככב בבלוג מוצר איפור חדש מבית Carelineשמציגה מראה איפור חדש לאביב / קיץ הקרוב - מראה בריא, שזוף וטבעי שמתקבל באמצעות ברונזר המעניק זוהר לפנים ולגוף.
היום הזדמן לי לנסות את המוצר הזה, ואני שמחה לשתף אתכן ברשמים שלי. מקווה שתהנו מהסקירה!


I have to admit that I've never used a bronzer before, mainly because the colors I've seen so far were way too dark for my skin tone, and so I was quite curious to try this product.
Apparently Careline's bronzer was a nice surprise, and despite the strong pigment, it looked very natural with my skin tone and I managed to create a natural look. With a wide blush brush and light motions I got a healthy sun-kissed glow. I think this is a great way for pale girls like me to get a tanned look for summer.

אני חייבת להודות שעד כה השתמשתי בסומק בלבד, והיתי סקרנית לנסות את הברונזר שעבורי הוא היה מוצר די חדש. 
במבט חטוף בסטנדים של חברות האיפור השונות, כל הגוונים של הברונזר תמיד נראו כהים מדי בעיני ואפילו מוגזמים כנגד גוון העור הבהיר שלי, ולכן נמנעתי מלהשתמש במוצר הזה בעבר. 
דווקא הברונזר של Carelineהפתיע אותי לטובה, ולמרות שהפיגמנט שלו די חזק, הצלחתי להשיג איתו מראה עדין וטבעי יחסית. בעזרת מברשת רחבה ותנועות קלילות התקבל מראה שזוף ובריא - פתרון מעולה לבנות בהירות כמוני שפשוט לא מצליחות (ואולי גם לא מנסות) להשתזף בעונות החמות יותר של השנה.


Careline Color Bronzer in Golden Rose is a mineral bronzer with a shimmery effect. It has a rich pigments and velvety texture. The bronzer gives the skin a healthy glow and a natural tanned look.
Available is two shades: Golden Honey and Golden Rose, full price 149.9 ILS / $43.
Careline products are cruelty free.

Careline Color Bronzer בגוון Golden Rose - ברונזר המכיל פיגמנטים מינרליים מצופים באבקת אורז עדינה היוצרים תחושה קטיפתית ונעימה על העור. לאחר המריחה הפודרה מתקבעת בעדינות כך שהגוון והברק נשמרים לאורך שעות ארוכות.
הברונזר, על בסיס פודרה דחוסה ובמרקם משי מבריק, מעניק מעטה שזוף וטבעי לפנים, לצוואר ולמחשוף.
מגיע בשני גוונים: Golden Rose ו-Golden Honey, מחיר מלא 149.90 ₪.

חברת קרליין אינה מבצעת ניסויים בבעלי-חיים. 


Careline's Golden Rose bronzer shade has a strong and shimmery pigment. The pressed powder looks more brown / golden, but on the face it creates a golden pink tone and you can get a natural tanned look. With this bronzer you can easily create a look that will suit a pale skin.

לברונזר בגוון Golden Roseשל Carelineפיגמנט חזק וגימור מנצנץ יפיפה. הצבע של האבקה הדחוסה די כהה ונוטה יותר לכיוון החום/זהוב, אבל על הפנים מתקבל גוון עם נגיעות ורדרדות ובהחלט אפשר להשיג איתו מראה שזוף ועדין שיתאים גם לבהירות, בלי להיראות מוגזם ולא טבעי.


Overall I was pretty impressed with this bronzer and I like the natural glowing look it creates. I think this product will come in handy and I can see myself using it often.
I hope you enjoyed this review, I would love to hear what you think of bronzers and if this is something you use on a regular basis in your makeup routine.
If you avoided using a bronzer in the past like me, I think you should give this product a try, it might surprise you!

בסך הכל התרשמתי לטובה מהברונזר ואהבתי את המראה הטבעי והזוהר שניתן ליצור איתו. לדעתי בהחלט מדובר במוצר מוצלח ואני רואה את עצמי ממשיכה להשתמש בו אל תוך הקיץ.
אני מקווה שאהבתן את הסקירה שלי, אשמח לשמוע מה דעתכן על הברונזרים בכללי והאם אתן משתמשות בברונזר כחלק מהאיפור הקבוע שלכן? 
אם גם אתן כמוני נמנעתן משימוש בברונזר בעבר, אני חושבת ששווה לכן לבדוק את הברונזרים החדשים של Careline, הם בהחלט עשויים להפתיע אתכן!

Superficially Colorful Lacquer - Remnants Of Winter Collection

$
0
0
Hello ladies! Today I have a special post to share with you, featuring a new indie brand created by a fellow nail polish blogger from Israel, you might know her as Jin from Superficially Colorful blog.
In this post I will be showing you my swatches for one of Superficially Colorful Lacquer collections:

Remnants Of Winter - Winter 2014 Collection
A collection characterized with very dark, rich basic colors with a touch of holo micro glitter.
These are NOT holographic polishes. They just have the tiniest holo spots here and there.
They all dry semi gloss  with somewhat a metallic look to them, but also a tiny bit gritty due to the glitter in them.


The Remnants Of Winter collection consists of five colors with a pearly/metallic finish and tiny holographic glitter specks. Their formula of all five was similar and you can obtain fully coverage with just two coats.
They dry to a slightly gritty finish because of the glitter in them, but once a top coat is added, they are perfectly smooth.
All photos were taken in indirect sunlight, I applied two coats and a top coat for the swatches.

Mud Slide was an important part of the collection before I even had a name for it.
A deep dark golden brown, inspired by the look of the roads in the winter. This is the color of the earth under the snow, the unpaved road washed by the rivers that went too high.
This is the color of my winter.


Seconds Before Dark - The strange weather of winter causes all sorts of colors in the sky at sun set. But just before the sun is gone, a deep crimson red is in control.


Turbulence is a dark violet-pink with a hint of color shift of blue, red and gold. Not a multi-chrome, just an undecided color that changes with the light. Inspired by the unquiet air, the faraway lightning storms and the clouds colliding and leaving.


Eye Of The Storm is a very dark and cold blue, somewhat metallic, with a little bit of holographic glitter. Inspired by the crazy storms this weird winter gave us: heavy clouds, unquiet sky and wild lightning storms.


Cape Cliffs is a dark forest green inspired by seaside cliffs covered in moss and sea weed after the rough seas of winter.


I hope you enjoyed my swatches and these unique and interesting colors from Superficially Colorful Lacquer. I think my two favorites must be Mud Slide which is very unique golden shade that reminded me of Tiger's Eye, and Eye Of The Storm which is a beautiful deep dark blue tone.
I love how the tiny holo glitter in them adds sparkle to the colors (though it's not that noticeable in the photos), and although this kind of pearly / metallic finish is not something I would usually go for, I think Jin managed to create really interesting colors that I don't recall seeing before.

Be sure to stop by Superficially Colorful Lacquer Shop to get the Remnants Of Winter collection. 
All polishes retail for $9, international shipping available.
Viewing all 286 articles
Browse latest View live